Introduction
Welcome to my tutorial on how to connect Arduino to Microsoft Flight simulator.This is the easiest method I found.
FSX SDK exists but lacks of documentation, is not useful as it requires huge amount of code. I wanted something easy and after some research I was able to connect to FSX using the FSUIPC API. Please note that to get some of the functionality you have to register FSUIPC. And I thought sharing this with the world, maybe someone will benefit. In this ``tutorial`` I will explain the process and not just give you the code. I believe in understanding not just knowing.
System design
Amazing system design :)
Amazing!!!! :) You get the picture
The Arduino send serial data to a VB application that uses the FSUIPC API to control FSX. In this tutorial we are going to control the Landing gear.
Requirements:
- Microsoft Flight Simulator X (FSX)
- FSUIPC 4, you can download it from:
- FSUIPC SDK
- You can also download it from the website shown above
- Scroll a bit down :)
- Arduino (any version)
- And how to get the input from a simple switch
- Switch, 1K resistor and some wires
- Microsoft Visual Studio (I have 2010)
- VB.NET
- .net framework (any) I have 4
Arduino part
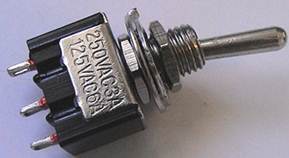
The first thing we have to do is to make the switch. Use my schematic and make your own simple switch circuit.
Note that the switch is a simple on/off switch just like this one here (I'm trying to make a panel for a homemade flight simulator)
We can proceed to the code for the Arduino.
Our Arduino scenario
We have to get the state of the switch; the Arduino is going to monitor the state of the switch with the digitalRead function.
When we get the state of our switch we will send serial data back to the computer.
Use your Arduino IDE and upload the code
Arduino Code
/* start of code */int LandingGear = 3; /* Landing gear*/
void setup() {
Serial.begin(9600);
pinMode(LandingGear, INPUT);
}
void loop() {
if (digitalRead(LandingGear) == HIGH){Serial.print("GEAR1");} else{Serial.print("GEAR0");}
Serial.println();
delay(1000);
}
/* End of code*/
What we need for the VB .NET solution?
DLL found in the FSUIPC SDK
You can find the dll in the ZIP file FSUIPCDotNetClient2.0.zip that came with the SDK
After you locate the DLL extract it in a folder of your option
Desktop application

Start a new project by going to file -> New Project
Select a Visual Basic .NET Windows Forms Application and give it a name of your choice
I gave the name StavrosFSX Arduino
Press the OK button to create the project
Just to be safe, SAVE your application
File -> SAVE ALL
Now it's a very important step we have to add a reference to the DLL that we found previously.
In the folder that Microsoft Visual studio created in my documents I am going to save the DLL so I don't have to worry about finding it later (if you are going to do the same make sure that you copy the xml file as well, (Note that the name of the folder is the same name of your project).
FSUIPC dll

You can also manipulate the references from the solution explorer but anyway.
Select the References Tab at your left and then the Add button, from the dialog that pops up click browse and find the DLL inside the folder you copied it.
The software is going to report the installed reference

Press the Save all menu one more time and let's start programming :)
As we saw before the Arduino includes one switch and we can get reports from the Arduino through the serial port. We are going to use the serial port to collect value of the switch and we are going to use the API (DLL) to send it to FSX.
 Simple :)
Design

I gave this names, please use your own style when naming the controllers don't use my bad naming I was in hurry :)
Serial Data observation

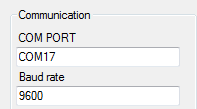
Now open your Arduino serial terminal and observe the different values that the Arduino transmits through the serial port, observe also the difference when we close and open the circuit. From here we make a mental note of the com port and the baud rate, in my case COM17 and baud rate 9600. Make sure the baud is the same with the Arduino in the void setup() or your data will be ``scrambled``
User settings

Now I like to have the program remember my com port and my baud rate so I don't have to type them all the time. Visual studio and the .NET framework allow us to do with the Application settings. You can set the user settings using the project properties as we did above when we referenced the API. Note that we can change the settings later in our code.
Get the user settings
Now let's write up a bit of code to get and save the settings.Double click on your form in order to get the form load code. And create a new sub to handle the loading into the form.
Your code should look like this
Private
Sub Form1_Load(ByVal sender As System.Object, ByVal e As System.EventArgs) Handles
MyBase.Load
loadUserSettings()
End
Sub
Private
Sub loadUserSettings()
Try
txtComPort.Text = My.Settings.ComPort
txtBaudRate.Text = My.Settings.BaudRate
Catch ex As
Exception
MsgBox(ex.ToString)
End
Try
End
Sub
For simple operations we can always use the load method of our form but I prefer to split the code because I'm planning to extend the code later and easier to handle and understand.
Run your application and check that everything is ok
Save the user settings
PrivateSub btnSAVESETTINGS_Click(ByVal sender As System.Object, ByVal e As System.EventArgs) Handles btnSAVESETTINGS.Click
Try
If txtBaudRate.Text <> ""
And txtComPort.Text <> ""
Then
My.Settings.ComPort = txtComPort.Text
My.Settings.BaudRate = txtBaudRate.Text
My.Settings.Save()
Else
MsgBox("Please type your connection settings")
End
If
Catch ex As
Exception
MsgBox(ex.ToString)
End
Try
End
Sub
It's a simple operation and we will use the button sub to handle the process.
Main programming
How our program works?Our program works by reading the serial port and when our program finds a difference in the readings it will transmit the appropriate command to the API. We are going to make our program to create a new thread for this purpose. The new thread will allow the user to have control of the form and allow him or her to stop the process.
Dim s1 As
SerialPort
Dim myThread As
Thread
Using this code we declare our serial port and the thread that we are going to use, put this code in the main class of your program.
Now let's double click our connect button and write the following code
Private
Sub bntConnect_to_serial_Click(ByVal sender As System.Object, ByVal e As System.EventArgs) Handles bntConnect_to_serial.Click
Try
s1 = New
SerialPort(My.Settings.ComPort, My.Settings.BaudRate)
s1.Open()
myThread = New
Thread(AddressOf read_serial_port)
myThread.Start()
Catch ex As
Exception
MsgBox(ex.ToString)
End
Try
End
Sub
Private
Sub read_serial_port()
'open the port, read the stream, send the stream to the thread
Try
While s1.IsOpen
Dim serialString As
String = s1.ReadLine
processReadings(serialString)
End
While
Catch ex As
Exception
MsgBox(ex.ToString)
End
Try
End
Sub
Delegate
Sub
CallBack(ByVal updateText As
String)
Dim messageFromSerial As
String
Private
Sub processReadings(ByVal readingText As
String)
If txtDATA_FROM_SERIAL.InvokeRequired Then
Dim d As
New
CallBack(AddressOf processReadings)
Me.Invoke(d, New
Object() {readingText})
Else
messageFromSerial = readingText
txtDATA_FROM_SERIAL.Text = messageFromSerial
If messageFromSerial = "GEAR1" & vbCr Then
picLandingGear.BackColor = Color.Green
lblLandGear.Text = "DOWN"
ElseIf messageFromSerial = "GEAR0" & vbCr Then
picLandingGear.BackColor = Color.Gray
lblLandGear.Text = "UP"
End
If
End
If
End
Sub
What this code does is to open the serial port and start a new thread
The thread will read the serial stream and send it for processing into the sub process processReadings() that takes as arguments the last reading. Because the new thread cannot interact directly with the main form we have to set a callback function, so as you noted the following code
If txtDATA_FROM_SERIAL.InvokeRequired Then
Dim d As
New
CallBack(AddressOf processReadings)
Me.Invoke(d, New
Object() {readingText})
We make sure that our thread can interact with the main form.
We then check if the Arduino sends the GEAR1 or GEAR0 that represent down and up.
Next thing to do is to talk about the API and how we will make it work.
We are going to use 2 documents found in the SDK the user guide as PDF and the FSUIPC4 Offsets Status PDF.
We are going to use our documents to learn how to write the API call.
In this tutorial we want to read and write a value to FSX. The guide specifies this as an offset.
To get the gear status we use
Dim gearstatus As
Offset(Of
Integer) = New FSUIPC.Offset(Of
Integer)(&HBE8)
And because the offset in the API guide is 0BE8 we replace the 0 with an H.
Now we have to set our program to read when it starts the value from FSX. We will use the form load to call a small procedure (sub)
Dim landingGear As
Integer
Private
Sub getGearStatus()
Try
FSUIPCConnection.Process()
landingGear = gearstatus.Value
Catch ex As
Exception
MsgBox(ex.ToString)
End
Try
End
Sub
You can see that I set a variable called landing Gear in the main class so our code can use it.
You can also see the exception handling try catch. If we start our application without FSX running we will get the following exception

Now for the useful part of our code :)
From the offset guide we can see that
Gear control: 0=Up, 16383=Down
So when offset gives 0 then the gear is up and 16383 is down.
Let's make a new sub process to handle the change and send it to the API
Private
Sub setLandingGear(ByVal p1 As
Integer)
If p1 <> landingGear Then
gearstatus.Value = p1
FSUIPCConnection.Process()
End
If
End
Sub
To use this code put the name of the sub with the number 0 or 16383 the sub will check if the system already has it set or else will set the new value.
Lastly we are going to create a control mechanism to close the serial port when we want.
Just replace this piece of code
Private
Sub bntConnect_to_serial_Click(ByVal sender As System.Object, ByVal e As System.EventArgs) Handles bntConnect_to_serial.Click
Try
If myThread.IsAlive Then
bntConnect_to_serial.Text = "Read Serial port"
myThread.Abort()
If s1.IsOpen Then
s1.Close()
End
If
End
If
s1 = New
SerialPort(My.Settings.ComPort, My.Settings.BaudRate)
s1.Open()
myThread = New
Thread(AddressOf read_serial_port)
myThread.Start()
bntConnect_to_serial.Text = "stop serial port"
Catch ex As
Exception
MsgBox(ex.ToString)
End
Try
End
Sub
Testing
You can get the full code by clicking here
Now let's test our applicationOpen FSX and load a simple flight making sure you are airborne, also make sure that your aircraft supports landing gear function :)
Get out of full screen and set the option in settings general pause on task switch so FSX will not pause when you click away.
After you connect your Arduino to your pc and you lunch the application you should have a fully functional system.
The landing gear should go up and down. If you have full realistic mode on FSX make sure you are 3000 feet and less altitude.
Hope it helps at some point; don't hesitate to contact me through the comments.
Tools
Visual basic .net 2010Arduino - 1.0 IDE
FSUIPC 4 API
Microsoft Word
.png)


.png)
Thanks for your support. I just wanted to know what must be the settings in FSUIPC in FSX so that the button will be read in by FSX. Every thing is running but when I press the button FSX do not detect the button.
ReplyDeleteThanks for your help
corneel.hagg@gmail.com
Actually I didn't change any of the default settings of FSUIPC.
DeleteI don't know if they performed an update on FSUIPC though. I will check it as soon as I reinstall FSX.
Thank you
I just tried it again and it works.... Check your settings and connections.
DeleteThank you
Just wanted to make sure, you run first your software then you start up FSX. Did you change the DLL file position? I just copy your the file into VB and run it didn't do any thing at all with the DLL file. I install FSX and FSUIPC 4. Is there step that I mist?
DeleteThanks for your help
Thanks for your reply, when you installed FSUIPC, did you register it?
DeleteFor the properties in the VB NET project make sure you follow this step ( i copied from above)
"Select the References Tab at your left and then the Add button, from the dialog that pops up click browse and find the DLL inside the folder you copied it."
You must have FSX started AND FLYING to use the application
it runs only at RUNTIME so take off put autopilot and make your game window not full screen. From options select the option that will allow the game to run if other windows are in running.
If you continue to have errors take screen shots and upload them somewhere and give me the link.
Thank you.
Thanks for this. I have been looking for something like this to get me started on my Cockpit project. I am hoping to create a Spitfire cockpit with working switches and gauges using the Arduino as the hart. Have you any experience driving a servo or a stepping motor with FSUIPC & Arduino? I am a novice when it comes to coding, and I am struggling with a few things. If you have time to answer a few questions, please get in touch. caveryis AT rogers DOT com is where you'll get me.
ReplyDeleteThanks again!
Hi i'm happy that you liked the article
ReplyDeletebut i haven't tried servos or stepping motors
Hello Stavros
ReplyDeleteI also thank you for your post. I have not yet tried this but I will soon as it is the most comprehensive instructional that I have found so far. However, I was wondering, as it seems Cory was, how to control instruments from FSX. I know how to make my Arduino move a servo, and I can control it by manually sending data over the Arduino serial port, but I don't know how to create the above Software/firmware interface that is described above, in reverse.
I need to code it so that the software on the pc side will take commands from the Arduino as well as sending them to the Arduino. The problem is that I have never used VB.net before, nor have I ever written a sketch for the Arduino to take serial commands for more than one output device. I fly A2As B-377 Stratocruiser and I am hoping to Build a pannel for it that has MP and RPM instruments on it. Such a creation would have 8 servos driven by 8 different commands from the PC-side software.
Hmmm... If you or anyone could help that would be great.
Thanks, Ryan
Im glad that you liked my article thanks.
DeleteIt doesnt have to be vb it can be Any supported lang from the api
Now for the problem os sending multiple data to/from arduino is to join the data in a way that the program And the board will be able to "understand".
As i did when i was doing my master i joined all data that i needed to send through serial for example led1:1;buz1:5;.... Etc
And you can have the board split the data into vars and do what is requred
Hope it helps if you like i can later today write something this in more detail
Sorry for any typos but im on mobile
Stavros
DeleteIf you could post more in detail about about "joining the code" it would be fantastic. I am a very visual learner when it comes to code. If I see practical examples it makes more sense to me. So if you can find the time to put something together, I would be grateful. Thank in advance!
Hi
ReplyDeleteI saw your switch and you can see mine here: http://arduino.cc/forum/index.php/topic,120128.0.html skip the swedish text!
If you are looking at the picture you can see that my switch is like yours, are not it?
If so I really like to know how you have connect the switch?
I am intending to enable the intern pull-up so I need to connect the switch to GRD and digitals pins, not the 5V!
I have Arduino!
Best Fredrik
You have to connect to 5v or 3v in order to detect the switch or close the circuit) just connect one leg of the switch to power the other to digital pin and the connection betwwen ground and digital with a resistor as i display it from the diagram.
DeleteThanks for this, great article. But I'm getting an exception when using your app: "Syste,.UnauthorizedAccessException: Access to the port 'COM6' is denied..." I would really appreciate your help.
ReplyDeleteThank you.
When it depends. From many things. You could get the exception because the Serial port is iin use. Or it may be the time between reconnection. You didnt give enough information like: if the application throws ecxeptions all the time or after a while. Try closing the serial port after you use it and make sure that the arduino ide is not using your port
DeleteHi Stavros, thanks for the reply. The Arduino IDE was using the port and thats what was generating the exception. Now I have an other problem, I've got my Arduino board wired and your app running, and when I turn the switch on and off your app reads it and shows the correct status. But the landing gear of the plane won´t work. I using an airplane with LG, the realistic mode is not the problem, if I press the "G" key the LG works. I don´t know whats the problem.
DeleteI think you should check if your code changes the variable value. Have Visual Studio to show you a message when the code is changing that value, this is to ensure that the variable is correctly changing. If everything is ok then i think you have a problem with the API. I dont know the version you are using if is the same as i did or if is newer. If the API is newer then you should find the reference from their website and get the correct address. If you recall i used the address (&HBE8) in VB. Make sure that is the same. Check the FSUIPC is running correctly if you registered it etc. Thanks
DeleteHi Stavros
ReplyDeleteI have successfull connect the switch mean I now know how to connect mine :)
I have copy your code above and it really works, I mean it can communicate witch the Arduino Mega card :)
I have undetood this:
You must have two program of thise application runnning at the same time, if you have two cards?!
You must insert the fsuipc offsets you want in the code, mean you cannot control it from the fsuipc, just from the app!?
I think I have understood it so?! :)
Since I am a rally novice when it about the code I need help with it. I would be much greatefull if you can help me. Simple than this is hard to find!
Best Fredrik
You can have 2 programs running but you can make 2 threads as well and is recommended.
Deleteif i understand correctly for the second question then you have the control from your application.
Hi Stavros (Reply at you reply to me)
ReplyDeleteI could reply bellow your reply so that is way I have to start a new comment!
If I understand you correct:
"You can have 2 programs running but you can make 2 threads as well and is recommended."
You mean two threads in the same active program!
"If i understand correctly for the second question then you have the control from your application." I must make all the offset from you VB app. Not into the fsuipc. FSUIPC it just a the link between the vb app and fsx, right? :)
Anyway If I could post a the design in ther way I thought you mean with two threads, it would much easier!
The code;
1
I have look at the code but I maybe can understand little bit of the code, ex. that "private sub" down to the "End sub" is reffering to a bit of the program ex. of the "Data form serial port"
2
If I want more and not just the "landing gear status" I have must make that status area is showing al my function i like to control?
Best Fredrik
Yes to all
DeleteExcept the code part. I cannot see the code at the moment so i dont know.
Hi
DeleteGreat so long :)
Do you have some mail or something so I can post some picture?
The code seams not so hard to understand but I need help with it!
Best Fredrik
Post them somewhere o line. Like rapidshare etc. give me the links. And i would have a look.
DeleteHi
ReplyDeleteYou can see;
http://www.ladda-upp.se/bilder/ioyaegwoqrhbiz/
The picture is showing the design, simple and easy to read!
Best Fredrik
Ok i see your design, good.
Deletejust code it as i did with the first serial port.
i dont think you will have any problem
Hi
ReplyDeleteSee;
http://www.ladda-upp.se/bilder/zgvbidktajbbod/
As I understand it, correct me if wrong:
For ex. ComPort box there is a single line of code!?
I am beginning to link the new box I have crited to the right type of code!
Best Fredrik
Hi
ReplyDeleteI have tried to see what I need to add in the code but I need some point in the correct direction?
See my new design:
http://www.ladda-upp.se/bilder/vsykglqmwchu/
I am must create exact the same code you have did for the diff.... forms but I need to change the code to point too my new forms!
I can just copy the whole code and change the name for com and baudRate too card2!
That is not so simple than just copy it so I must add a couple of line. the question is what lines must I change?
Best Fredrik
change the code in the button BUT change the line of code to point to a copy of the thread sub.
Deletei think it will do the trick.
PS if you use a translator make sure you check it first :)
Hi
ReplyDeleteI am trying to follow you create explanation of the code. I can see that;
" Dim s1 As SerialPort
Dim myThread As Thread"
Is handle the threaf do I like to add it as copy and change the name to s2 for the copy?
We start to sort this out, you need to name the thread to a exact name so the two thread do not point too same thread therfore I am naming it as s1 and s2?!
If correct I must copy al the line with s1 and name the copy too s2!?
Best Fredrik
yes you should change the names of the variables for your second thread
DeleteHi
ReplyDeleteOk, is that wrong to copy the whole code and just change the names so the second copy point to my second COMPORT?
You read and write to the second comport as same ad you do with the fist comport!
The problem is that there can be a some error because the program find same values into the two copies?!
Best Fredrik
Hi
ReplyDeleteI start to understand the code and what tje line does but it´s far from to understand it all :)
give me your email, i will not publish it and i will add you to my gmail
DeleteHi
ReplyDeleteSend me a mail so I can sen you my thought!
Hi
ReplyDeleteI have now checked all the code and I have litle more understanding of how the code is linking to the diff.. box and forms :)
I have did a debugg and no errors were found :)
I can mail you the code so also you can check it?
Best Fredrik
I sended u an email a few hours ago. Send the code to my email. Better zip all the project
DeleteHi
ReplyDeleteI can now read the two cards :)
good job Fredrik, i am glad that my code was useful to you
DeleteHi
ReplyDeleteThank´s:)
Very simple and great code to follow :)
Hi
ReplyDeleteDo you know if there is some risk to short-circuit these type of switches that you have. You see I am going to put the switch in aluminium sheet?
The sheet shall works as a cover and the switch have to be srewed into the sheet!?
Best Fredrik
I dont know.
DeleteHi
ReplyDeleteI can almost start to program your application so it can work with my Arduino cards! :)
I have begin to stady programming (C#) but I have so much more to leaarn before I can fully understand all the code!
I will be back with questions soon//
Best Fredrik
Hi
ReplyDeleteI can now begin to get my components to communicate with FSX. First I need to program it in your application :)
Before I can start to program I really must understand the structure of the applicationit would much better. I also must check, see bellow:
1.)
That is possible yo link almost 120 components with the app...!? The all function I am going to use in FSX have offsetts!
2.)
Since I am a begginner too program in C# but I have seen that you have program it in VisualBasic?
3.)
If so it is possible to reprogram it in C#?
3.)
If I can stay in VB can you help me with it?
Best Fredrik
120 components are allot.....
Deleteyou will probably need more arduinos :) or a MEGA!.
About reprogramming the application its up to you basically. If you want and have the time do it in c#.
I prefer VB for my hobby things.
The application can be done in VB or any other language.
I cannot promise that i will have the time to help you out.
Once you figure out how to connect all the things on the arduino(s) and you will probably thinking about sending the data to the serial port, then you will have the complexity of analysing all the data in the application probably multitasking the application etc.
Keep it open source others can be interested in
I wish i had the time to do this kind of project but i work full time and my arduino is collecting dust :(
Best regards
Stavros
Hi
ReplyDeleteI have 120 IO ports in about 75 components and two Arduino Mega2560!
I will stay in VB and I am trying to past and copy the correponding code of lines etc. etc. I will be back with my thoughts about the code :)
I have a glue in what way I will do this :)
Best Fredrik
Hi
ReplyDeleteMy goal is to interface the application with pmdg737ngx and FSUIPC. But I have not so much knowledge to rewright the application so the best is if your application will works without to code a lot?!
PMDG737ngx´s offset and control trough FSUIPC is like bellow:
You have the offset "64F4" and control nr as follow: 0=RETRACT
1=EXTEND
2=ON
I can accept some job if this will work with the aircraft!
Last question: Is your application stable enough to be working in say 8 hours?
Best Fredrik
You have to re write the application that is my thinking. The application i wrote is about one thing and one thing only.
DeleteThis project that you are planning is huge. You have to do your research before you start coding.
First make the arduino part, think how you will send the data back to the computer and from that part i think you will do the processing.
Just have in mind that is going to take allot of time.
Hi
ReplyDeleteIn that case I cannot use you app... :(
I have learn alot even if I by a P&P card like Flight Deck Solution SYS board!
Best Fredrik
P n p sounds like a good solution. There alot of designs on the web. Search on google maybe there a solution for your needs.
DeleteThanks for this article, I found it extremely useful.
ReplyDeleteUnfortunately, I did not get my landing gear button to work. Everything goes well until the FSUIPC part: I've uploaded the code to the arduino, downloaded your vb program and configured the settings. When I ran it, it displayed the button state correctly. However, FSX doesn't respond at all to the button. Are there some settings I might have missed?
Take a look at this screenshot, maybe it will help you finding the problem.
http://s9.postimage.org/6hxc0plp9/screenshot.png
Thanks a lot!
Attila
Hi Stavros,
ReplyDeleteI have been researching FSUIPC/FSX/Arduino for a little while now and that's how reached this page.
I have no knowledge of programming, but still found your blog to be very informative.
Thanks for sharing it with all other hobby cockpit builders.
Do you think, an Arduino could be used as an 'Output' board also. I mean, it reads an FSUIPC offset and then turns LEDs on/off as required?
Take care,
Mickey
you are welcome.
DeleteYes it can be done. You can send serial data down to the board and have it switch on leds etc
take a look
// If you know the size of the String you're expecting, you could use a char[]
// instead.
String incomingString;
void setup() {
// Initialize serial communication. This is the baud rate the Arduino
// discusses over.
Serial.begin(9600);
// The incoming String built up one byte at a time.
incomingString = ""
}
void loop() {
// Check if there's incoming serial data.
if (Serial.available() > 0) {
// Read a byte from the serial buffer.
char incomingByte = (char)Serial.read();
incomingString += incomingByte
// Checks for null termination of the string.
if (incomingByte == '\0') {
// ...do something with String...
incomingString = ""
}
}
}
im newbie and no understand code anything, but have arduino uno rev,3 board and usesome led right :)
ReplyDeletebut i have dream, need my msFS2004 flight simulation link how use arduino whit arduino ?
need first whit uno code how read all 11 maximum toggle switch in uno board and show led were position flaps have,
no hav flape,10degree,20d,30d,full,
and secon i buy mega arduino board and adding more more switch,and maybe rotary encoders A-B HDG and VOR and other gauge.
thats my dream whit arduino,but who have code to me ?????
i no understand code lot. no can made code.
Its very nice that you have an interest for the arduino and fsx.
DeleteIts a good oportunity for you to learn and understand the coding of arduino. Now a days i use the arduino for specific medical sensoring. No complicated code. Just transmiting the data to a processing server.
You should do the same. Use the client server model. Just transmit the data to a computer and let the pc do the processing.
Γεια. Πάρα πολύ ενδιαφέρον blog. Το προσπάθησα αλλά δεν μου βγήκε :(
ReplyDeleteΤο πρόγραμμα διαβάζει το serialprint μια χαρά, αλλά μέχρι εκεί. Έχω μιδενικές γνώσεις VB δυστυχώς και δεν μπορώ να βγάλω άκρη. Ευχαριστώ πάντως για τοις πληροφορίες. Η αναζήτηση λύσεων συνεχίζεται
Hello
ReplyDeletereally nice code you have there but I have a question: Which part of the code needs to be changed to fold the wings when you switched it?? or is it possible to connect this to a keyboard shortcut in fsx???
How do you send data to arduino through VB from fsuipc
ReplyDelete